IBHS research shows embers account for up to 90% of home ignitions during wildfire events. That's the problem fire hardening is designed to solve.
This guide covers every major zone of a home — roof, vents, walls, windows, decks, and landscaping — so you know exactly where to focus your effort and investment.
Key Takeaways
- Fire hardening modifies a home's exterior materials and design to resist ignition from embers, radiant heat, and direct flame
- The roof and vents are the highest-priority vulnerabilities; embers enter through gaps there before reaching anything else
- Walls, windows, decks, fences, and attached structures all require fire-resistant materials and sealed transitions
- Zone 0 (the 0–5 foot buffer around the home) dramatically reduces ignition risk and must be completely noncombustible
- Fire hardening works as a whole-home system; one weak link can compromise everything else
What Is Fire Hardening?
Fire hardening is the process of upgrading a home's building envelope — its exterior shell of materials, surfaces, and assemblies — to reduce the likelihood of ignition during wildfire exposure. It's distinct from defensible space, which focuses on vegetation management around the home. Both are required — and each loses effectiveness without the other.
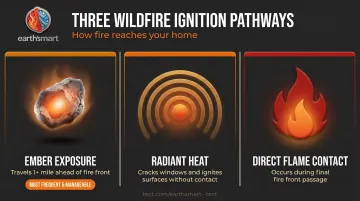
CAL FIRE defines home hardening as using construction features, building materials, and maintenance practices to increase a building's resistance to three specific ignition pathways:
- Ember exposure — wind-driven burning debris that can travel more than a mile ahead of a fire front and land on or in a home
- Radiant heat — intense heat radiating from burning vegetation or nearby structures, which can crack windows and ignite combustible surfaces without direct contact
- Direct flame contact — flames reaching the structure itself, typically during the final stages of fire front passage
Of these three, embers are the most dangerous in frequency and, fortunately, the most manageable through building upgrades. They're the reason a home can ignite hours before the fire front arrives — and why hardening the building envelope matters so much.
Fire hardening applies to both new construction and existing homes. California's Chapter 7A WUI building standards govern new construction with permit applications submitted after July 1, 2008 in designated high-risk zones. For existing homes, hardening is addressed through voluntary upgrades, insurance requirements, and real estate disclosure obligations. Whether you're rebuilding or retrofitting, the same core principles determine how well your home survives exposure.
Hardening Your Roof, Vents, and Chimneys
The roof presents the largest exposed surface area on any home. Gaps in roofing materials and debris accumulation give embers exactly the foothold they need to ignite the structure from within.
Roofing Materials and Ember Management
Class A fire-rated roofing is the non-negotiable starting point. Approved materials include:
- Standing-seam metal
- Clay and concrete tile
- Composite and asphalt-mineral roofing
- Slate
Wood shake and wood shingle roofs are high-risk and should be replaced in any fire-hardening upgrade. The sub-roof layer matters too — fire-resistant underlayment adds a secondary barrier if the outer surface is breached.
Beyond material choice, maintenance drives ongoing performance:
- Clear gutters and roof surfaces of dead leaves and pine needles regularly — debris accumulation creates an ember-ready fuel bed directly on the structure
- Install noncombustible gutter guards to prevent buildup between cleanings
- Add a metal drip edge to close the gap above the gutter system where embers can lodge
For homes being rebuilt or undergoing major renovation, earth'smart powered by tect's Earth'smart™ projects specify Class A roofing systems engineered for 50–100+ year service life — standing-seam metal, clay tile, concrete tile, and slate — paired with noncombustible eaves and fire-resistive wall-to-roof transitions. Manufacturer input on roofing specs is built into the design phase, when those decisions can be made correctly across the whole system.
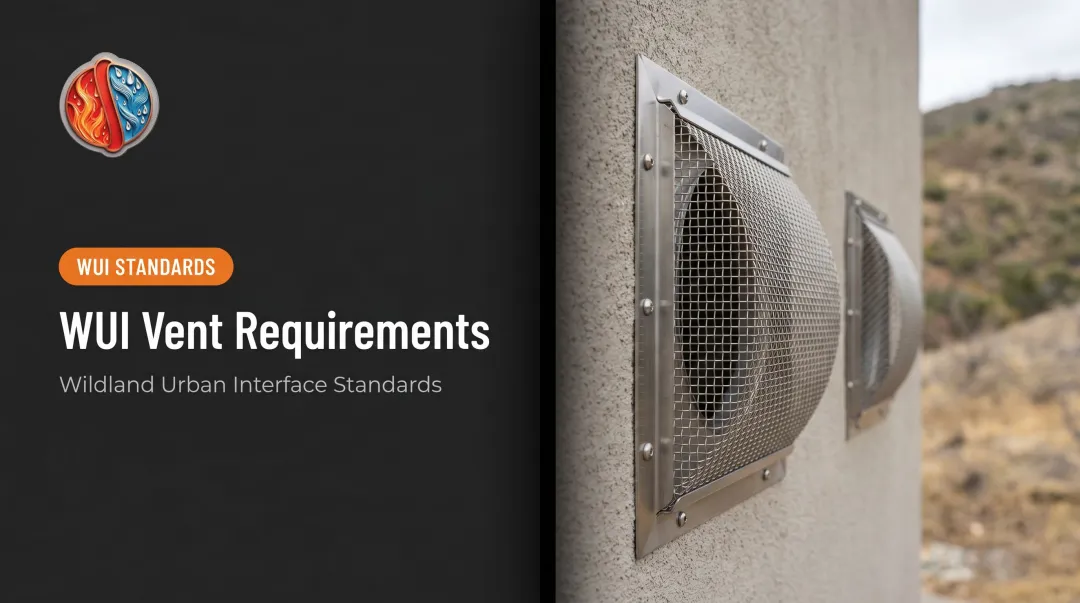
Vent and Chimney Protection
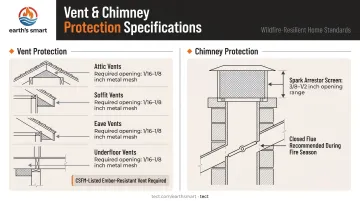
Unscreened vents are one of the most common ember entry points. Attic, soffit, eave, and underfloor vents all require protection using noncombustible, corrosion-resistant metal mesh with openings between 1/16 inch and 1/8 inch. Standard window screen mesh is not adequate.
The stronger upgrade is a California State Fire Marshal-listed WUI ember-resistant vent — a tested and listed product that provides verified flame and ember resistance, not just physical screening. These are the recommended standard for any serious fire-hardening project.
For chimneys, install a metal spark arrestor screen with openings between 3/8 inch and 1/2 inch — small enough to catch outgoing embers, large enough to prevent clogging from ash. Close the fireplace flue during wildfire season when the fireplace is not in use — an unprotected flue gives embers a direct path into the home.
Hardening Walls, Windows, Decks, and Attached Structures
Once the roof and vents are addressed, the focus shifts to the lateral surfaces — the walls, glazing, and any attached structures that can act as fire pathways into the main building.
Walls and Siding
Exterior wall material determines how your home responds to both radiant heat and direct flame. Recommended materials include:
- Stucco: noncombustible and effective against both flame and ember exposure
- Fiber cement siding: fire-resistant, durable, and widely used in WUI construction
- Ignition-resistant treated wood: a lower-risk alternative to standard wood cladding when properly specified
High-risk materials to avoid or replace: vinyl siding (vulnerable to deformation from radiant heat and ignition from direct flame) and wood lap siding with gaps, holes, or deterioration.
Coverage must be continuous from the foundation to the roofline. Any gap or transition into a combustible material creates a pathway for fire to travel upward along the wall.
For homeowners rebuilding in California WUI zones, non-combustible wall systems outperform conventional wood framing on every measure that matters: ignition resistance, ember exposure, and structural performance for seismic loads. Earth'smart powered by tect's Earth'smart™ projects specify pre-insulated concrete masonry (CMU), insulated concrete forms (ICF), and autoclaved aerated concrete (AAC) as exterior wall assemblies, coordinated through the earth'smart powered by tectApp™ community of 70+ vetted manufacturers and locked in during design rather than decided late in construction.
Windows and Glazing
Standard single-pane glass fails under radiant heat — it cracks and creates an opening for flames and embers before the fire front even arrives.
The minimum upgrade is dual-pane windows with at least one tempered glass layer. Tempered glass is approximately four times more resistant to breaking during wildfire exposure than standard glazing. Chapter 7A requires multipane glazing with at least one tempered pane for new WUI construction.
Beyond the glass itself:
- Reduce the size and number of windows on sides of the home facing heavy vegetation
- Install screens on all operable windows to catch embers before they contact the glass
- Consider exterior shutters on the most exposed elevations
Decks, Garages, and Fences
Combustible decking and debris accumulation beneath decks are serious ignition risks. Recommendations:
- Use ignition-resistant composite decking or fire-retardant-treated wood
- Install minimum 6-inch vertical metal flashing where the deck meets the exterior wall
- Maintain an ember-resistant clear zone underneath — no stored wood, no accumulated debris
- For decks over slopes, defensible space below the deck is also necessary to reduce upward flame travel
Fences connected directly to the home function as fire fuses. NIST research involving 187 fire experiments demonstrated how residential fences and mulch beds contribute to fire spread in communities. The fence section within 5 feet of the structure must use noncombustible material — wood and vinyl fencing in this zone should be replaced.
For garages:
- Weather-strip gaps larger than 1/8 inch between garage door panels and the frame
- Ensure the door opener has battery backup for use during power outages
- Keep a fire extinguisher accessible inside
When rebuilding or planning a major renovation, the connection points between fire-resistant and combustible elements require explicit attention. A wood fence attached to a stucco wall, or a combustible deck against a noncombustible siding system, creates an ignition bridge that undermines the rest of the investment.
These transition details are among the most common oversights in fire-hardened construction — and the hardest to fix after framing begins. Teams like earth'smart powered by tect coordinate architecture, engineering, and construction with direct manufacturer input through the earth'smart powered by tectApp™ community, so transition conditions are resolved in design drawings, not flagged during a site walk.
Landscaping and Defensible Space
No matter how well a structure is built, a home surrounded by continuous fuel is under extreme threat when fire arrives. Defensible space forms the outer layer of fire hardening, working in direct coordination with the building itself.
CAL FIRE organizes defensible space into three zones.
Zone 0: The Home Ignition Zone (0–5 Feet)
Zone 0 is the highest-priority landscaping action a homeowner can take. Within 5 feet of the structure:
- Remove all combustible materials: mulch, dead plant material, wood furniture, firewood stacks, trash cans, and propane tanks
- Replace organic mulch with gravel, stone, pavers, or bare mineral soil
- Eliminate any vegetation that could carry a ground ember directly to the foundation or wall assembly
According to IBHS research, an ember-resistant 0–5 foot buffer can cut a home's wildfire ignition risk roughly in half — making it one of the most cost-effective improvements a homeowner in a fire zone can make.
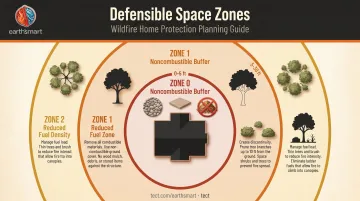
Zone 1 and Zone 2: Managed Vegetation
Zone 1 (5–30 feet) focuses on removing continuous fuel pathways:
- Prune tree branches to at least 6–10 feet above the ground
- Remove branches within 10 feet of the structure
- Space plants to break up continuous vegetation — no plant-to-plant fuel pathways
- Clear dead plant material regularly throughout fire season
- Choose lower-risk species with higher moisture content and lower oil and resin levels — these are harder to ignite, not fireproof
Zone 2 (30–100 feet) focuses on reducing fuel density:
- Thin trees and shrubs to reduce canopy continuity
- Remove dead wood and ladder fuels that allow ground fire to climb into tree canopies
- Maintain vegetation clearance along driveways — state SRA Fire Safe Regulations require at least 14 feet of unobstructed horizontal clearance and 13 feet 6 inches of vertical clearance for emergency vehicle access
- Ensure your address is clearly visible from the road and that any gate can be opened by emergency personnel
Common Fire Hardening Mistakes to Avoid
The single most damaging mistake is treating fire hardening as a checklist of isolated upgrades rather than a whole-home system. Install a Class A roof but leave unscreened vents beneath it, and embers will still find their way in. Wildfire exploits the path of least resistance. Every weak link matters.
Three patterns stand out:
1. Treating landscaping and structure hardening as either/or choices. Both are required. A perfectly hardened structure surrounded by continuous fuel remains at extreme risk — and a cleared site with a combustible building envelope is equally vulnerable. A 2025 Nature Communications study modeled a 52% reduction in structure losses from combined home hardening and defensible space, not either measure alone.
2. Deferring maintenance. A fire-hardened home regresses without upkeep. Debris in gutters, leaf litter against vents, and deteriorated garage door weather stripping all undo previous investment. Fire hardening requires annual attention, not a one-time upgrade.
3. Ignoring transitions between combustible and noncombustible elements. A wood fence connected to a stucco wall, a combustible deck adjacent to fiber cement siding, or an unscreened vent under a Class A roof — these connection points are where hardening fails. The interface between fire-resistant and combustible materials requires explicit design attention, not assumption.
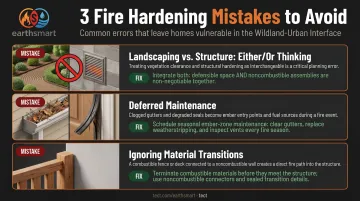
In most rebuilds, these failures trace back to the same root cause: critical product and system decisions get made late, during construction, without input from the manufacturers behind those materials. Getting the right experts involved at the design stage — before anything is specified or permitted — is how these failure points get caught before they're built in.
Frequently Asked Questions
What does fire hardening mean?
Fire hardening refers to modifying a home's exterior materials, surfaces, and design to reduce ignition risk from embers, radiant heat, and direct flame during wildfire. It covers everything from roofing materials and vent screening to wall cladding, windows, decks, and the immediate noncombustible buffer around the structure.
Is fire hardening disclosure required in California?
Yes. California AB 38 requires sellers in high or very high fire hazard severity zones (homes built before January 1, 2010) to disclose hardening vulnerabilities. As of July 1, 2025, disclosures must also reference the State Fire Marshal's low-cost retrofit list. Verify current requirements with CAL FIRE or a licensed real estate professional.
What is the most vulnerable part of a home during a wildfire?
The roof and vents. The roof presents the largest surface area for ember accumulation, and unscreened vents provide a direct pathway for embers to enter and ignite the structure from the inside — often before firefighters can intervene.
Does fire hardening a home lower homeowner's insurance premiums?
It can. California's Safer from Wildfires regulation requires insurers to offer discounts for qualifying mitigation actions — reported ranges run from 4% to 40% depending on the insurer and improvements completed. Contact your broker to confirm which upgrades qualify under your specific policy.
What materials are best for fire hardening a house?
The top categories: Class A fire-rated roofing (metal, tile, composite or slate), fiber cement or stucco exterior cladding, dual-pane windows with at least one tempered glass layer, CSFM-listed ember-resistant vents or noncombustible metal mesh (1/16–1/8 inch), and ignition-resistant composite decking.
How much does fire hardening a home typically cost?
Costs range from a few hundred dollars for vent screening and weather stripping to tens of thousands for full re-cladding or roof replacement. For new construction, IBHS and Headwaters Economics report California WUI standards add roughly $13,000 to a 1,750-square-foot home — a fraction of what total loss costs.