Many homeowners underestimate how long the process takes, how many decisions it demands, and how much the team they assemble matters before a single drawing is produced. The good news: understanding the full picture before you begin puts you in a far stronger position than most.
This guide walks through each phase — vision setting, budgeting, team assembly, the design process, performance-driven design decisions, and construction — so you can move forward informed rather than reactive.
TL;DR: What to Know Before Designing a Custom Home
- Custom home projects regularly take 2+ years from concept to move-in; build contingency time and funds into your plan from day one
- The team you assemble before design begins is your most important decision
- Early design changes cost a fraction of what they cost once framing starts
- Building to minimum code produces a compliant home, not necessarily a durable or resilient one
- If you're in a wildfire, seismic, or flood zone, performance-based thinking needs to start from the very first conversation
Start With Your Vision: Lifestyle, Goals, and Priorities
The most successful custom homes begin not with aesthetics, but with how a family actually lives. Before sketching a single floor plan, think through:
- Daily routines — Where do mornings start? How does homework, cooking, and entertaining actually flow?
- Space usage patterns — Which rooms get used daily vs. rarely?
- Future changes — Children aging out, aging parents moving in, remote work expanding, or resilience needs shifting as your neighborhood's risk profile changes
- Outdoor connection — How much does indoor-outdoor living matter to your household?
- Long-term plans — Aging in place, multigenerational living, resale value, and how your home performs under stress over decades
Separating "dreams" from "priorities" early saves money and prevents regret. A dream might be a home theater; the priority might be a larger primary suite. Knowing the difference shapes every tradeoff that follows.
Use Images as Communication Tools
Collect inspiration — save photos, build mood boards, pull reference images. Share these with your design team not as shopping lists, but as pattern-revealing documents. Patterns in what you consistently save reveal your real preferences more reliably than any verbal description.
Understand the Time Commitment
Custom home design demands active participation. You'll make hundreds of decisions across many months — floor plan layout, ceiling heights, exterior materials, trim profiles, systems placement. Homeowners who go in knowing this tend to make better choices, catch problems earlier, and finish with fewer regrets.
Set a Realistic Budget Before Design Begins
What a Complete Custom Home Budget Actually Includes
Cost-per-square-foot is the most commonly cited — and most commonly misused — budget metric. It captures hard construction costs but misses everything else. A complete budget includes:
- Hard construction costs — framing, mechanical, finishes, labor
- Soft costs — architecture, engineering, surveys (NAHB data puts architecture and engineering at roughly $6,480 for a typical build, though this rises significantly for custom complexity)
- Site prep and grading — NAHB's 2024 data shows site work averaging $32,719, or 7.6% of construction cost
- Permitting and fees — building permits averaged $7,640; impact fees $6,367; water/sewer fees $6,260
- Utility connections, landscaping, and exterior hardscaping
- Interior furnishings — often budgeted separately and often forgotten
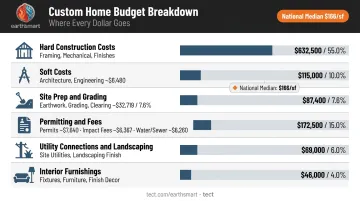
According to NAHB's 2024 Cost of Constructing a Home analysis, the national median construction cost was approximately $166 per square foot in 2024 — but regional variation is significant. New England median: $190/sf. Pacific: $167/sf. East South Central: $129/sf. These are starting points for conversation, not final numbers.
Financing a Custom Home Build
A custom home build is financed differently than a standard home purchase. Construction-to-permanent loans disburse funds in stages as work is completed, then convert to a traditional mortgage upon completion. Lenders evaluate both your financials and your builder's qualifications — which is one reason team selection matters so early.
Speak with a lender before design advances meaningfully — what you can finance shapes what you should design.
Every custom build should carry a contingency fund — typically 10–20% of total construction cost held in reserve. Custom homes involve unknowns that even experienced builders cannot fully predict. Site conditions, material lead times, and design changes all create costs that contingency funds absorb.
Designing to Budget Without Sacrificing What Matters
Strategic prioritization means spending more on elements that are expensive or disruptive to change later:
- Structure and foundation
- Building envelope (roofing, windows, exterior cladding)
- Flooring and cabinetry (costly to replace mid-life)
- Mechanical systems
Save on decorative or easily swappable items — light fixtures, hardware, interior paint colors. Better systems coordination upfront also reduces lifecycle costs — the money spent on integration early pays back through lower long-term maintenance.
Assemble the Right Team Before Design Begins
Architect, Design-Build, or General Contractor: Understanding Your Options
Three primary team structures exist for custom home delivery:
| Model | What It Means | Tradeoff |
|---|---|---|
| Architect + separate GC | Independent design, then contractor bid | More owner coordination required |
| Design-build firm | One contract covers design and construction | Less separation of checks and balances |
| Owner-builder with GC | Owner manages process, GC manages subs | Highest time and risk for owner |
None is universally superior. The right choice depends on your available time, risk tolerance, and project complexity.
One consistent rule: assemble your team before you purchase land when possible. An experienced architect or builder can evaluate a site's buildability, flag zoning constraints, and identify cost implications before you're financially committed.
What to Look for When Choosing a Builder
Portfolio photos tell you what a builder has built. References tell you what it's like to work with them. References, in particular, reveal what the working relationship actually looks like day to day.
Ask prospective builders directly:
- How do you structure your contract and pricing?
- Who is my day-to-day contact once construction begins?
- How are design decisions documented and approved?
- Can I speak with two or three past clients?
- What is your experience with homes of this complexity, or in this risk environment?
Specialty consultants — structural engineers, systems designers, material specialists — should be brought in alongside your core team, not after floor plans are locked. When teams bring these specialists in late, costly revisions almost always follow.
Earth'smart powered by tect, for example, connects homeowners with manufacturer-level expertise through the earth'smart powered by tectApp™ community of 70+ building product manufacturers — so system decisions get made correctly at concept, not patched together during construction documents.
The Cost of a Fragmented Team
When an architect designs without builder input, or systems engineers don't enter the process until floor plans are finalized, the outcome follows a familiar pattern: design conflicts, cost surprises, and construction delays.
Early coordination is a form of risk management. The most expensive changes in any custom home project are the ones discovered after framing begins — because they require undoing work already done. Fragmented teams consistently surface those problems too late.
The Custom Home Design Process, Step by Step
From Concept to Schematic Design
The design process moves through distinct phases:
- Programming — Define needs, priorities, room relationships, and site constraints
- Schematic design — Rough layouts, massing studies, overall site approach
- Design development — Refined floor plans, elevations, material directions
- Construction documents — Detailed drawings and specifications for permits and construction
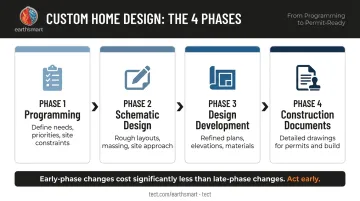
Multiple iterations through the early phases are normal — and valuable. Catching a problem in schematic design costs a fraction of catching it in framing.
3D renderings during design development help you catch spatial and material problems before framing begins. They let you evaluate proportions, material relationships, and how light moves through a space — before any physical work starts.
Translating Vision Into a Functional Floor Plan
A floor plan does more than organize rooms. It defines how your household functions daily:
- Traffic flow — How do people move through the home morning, evening, during gatherings?
- Natural light — Which rooms need morning vs. afternoon sun?
- Indoor-outdoor connection — How does the kitchen relate to outdoor dining?
- Privacy adjacencies — Primary suite separation from children's rooms, guest suites, home offices
Walk through your daily routines mentally as you review floor plan drafts. What feels logical on paper doesn't always function logically in life.
Your routines aren't the only variable, though. Site conditions shape what the floor plan can actually do. Slope, solar orientation, prevailing winds, setbacks, and view corridors all constrain and inform design. A floor plan that ignores site conditions creates functional and performance problems that can't be corrected after construction.
Construction Documents and Permits
Construction documents are the detailed drawings and specifications contractors use to build and municipalities use to issue permits. They mark the transition from design decisions to buildable instructions.
Permit timelines vary considerably by jurisdiction — and delays are one of the most common sources of project schedule slippage. A few factors that affect how long review takes:
- Region: NAHB/Census data for 2024 shows the national average from permit authorization to construction start was 1.4 months; the Pacific division averaged 2.1 months, the longest of any region
- WUI zones: Additional fire-resistive construction requirements trigger extended plan review — build extra time into your schedule
- Jurisdiction complexity: Some municipalities review faster than others; confirm timelines with your architect before locking in a start date
Designing for Durability, Resilience, and Long-Term Performance
Building code represents a legal minimum — not a performance target. Homes designed to code compliance alone aren't necessarily durable, low-maintenance, or capable of surviving the conditions they're most likely to face. Homeowners who treat code as the finish line often end up with homes that underperform in extreme weather or become difficult to insure in high-risk areas.
Structure, Envelope, and Systems: The Three Pillars
The building envelope — roofing assembly, wall construction, windows, air and moisture barriers — is your home's first line of defense against heat, moisture, fire ember intrusion, and structural loads. These decisions are made during design and are costly to change later.
Structural systems in high-risk areas require engineering that goes beyond standard residential practice:
- Seismic zones require lateral force resistance systems per California Building Code Chapter 16
- Flood zones require lowest floor elevation at or above Base Flood Elevation per FEMA standards
- WUI areas require fire-rated assemblies, ignition-resistant materials, and ember-resistant detailing
HVAC, plumbing, electrical, and smart home infrastructure all need to be planned alongside the floor plan — not retrofitted into it. Coordinated decisions reduce conflict, avoid costly rerouting during construction, and produce systems that perform reliably across the home's life.
Designing for Fire, Flood, and Earthquake Exposure
For homeowners in high-risk areas — particularly those rebuilding after wildfire or in the wildland-urban interface — these are baseline requirements for homes meant to last.
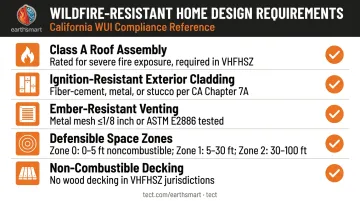
Wildfire-specific design requirements include:
- Class A roof assemblies — required in LA County Very High Fire Hazard Severity Zones; Class A coverings are rated for severe fire-test exposure under IBC Chapter 15
- Ignition-resistant or noncombustible exterior cladding — fiber-cement, metal siding, and traditional three-coat stucco meet California Chapter 7A requirements; IBHS Wildfire Prepared Home Plus requires all-noncombustible wall coverings
- Ember-resistant venting — openings screened with corrosion-resistant metal mesh not exceeding 1/8 inch, or vents tested to ASTM E2886
- Defensible space — Zone 0 (0–5 ft): non-combustible materials only; Zone 1 (5–30 ft): reduced vegetation; Zone 2 (30–100 ft): annual grasses cut to 4 inches max
- Non-combustible decking — wood decking is prohibited in VHFHSZ-governed jurisdictions
Research from NBER found that California homes built to 2008 standards were approximately 40% less likely to be destroyed than homes built in 1990 under identical wildfire exposure conditions. That gap reflects real engineering choices — and going beyond minimum code widens it further.
Earth'smart powered by tect works in Pacific Palisades and across WUI areas with this as the starting point. That means fire-resistive assemblies, non-combustible materials throughout, long-life structural systems, and dedicated on-site water supply integrated with site-scale fire suppression. The goal is 100+ year homes that minimize long-term maintenance costs while remaining insurable.
Permits, Construction, and Moving Into Your Custom Home
The Construction Sequence
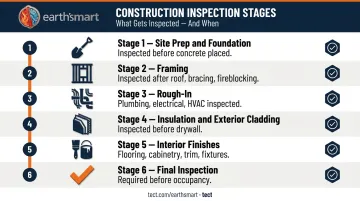
Construction follows a predictable sequence, with critical inspection points at each phase:
- Site preparation and foundation — Inspected before concrete is placed
- Framing — Inspected after roof, bracing, fireblocking, and rough systems are in place
- Rough-in — Plumbing, electrical, and HVAC inspected before walls close
- Insulation and exterior cladding — Inspected before drywall
- Interior finishes — Flooring, cabinetry, trim, fixtures
- Final inspection — Required before occupancy
Stay engaged throughout — not just at the start and end. The inspection before drywall is your last opportunity to verify what's inside your walls before it's sealed in permanently.
Final Walkthrough and Punch List
The final walkthrough is when incomplete or deficient items are identified and documented before closing — your only chance to resolve issues with your builder while you're still under contract. Walk every room, test every system, and document everything in writing. A verbal agreement carries no weight once you've taken possession.
Closing, Move-In, and Insurance
Before possession:
- Confirm all utility transfers are complete
- Secure homeowners insurance — it must be in place before you take possession
- Verify all warranties are documented in writing
- Understand your builder's post-occupancy process for first-year issues
That insurance line on the checklist deserves more than a checkbox if you're building in a WUI or high-risk fire zone — treat it as a design-phase conversation, not a closing-week errand. The California FAIR Plan reports 684,388 policies in force as of March 2026, up 152% since September 2022, reflecting how significantly standard market coverage has contracted in high-risk areas. If you're building in one of these areas, assume the insurance conversation is part of your design process, not an administrative afterthought.
Frequently Asked Questions
How much does it cost to design and build a custom home?
The 2024 national median was approximately $166/sf for construction alone — but that excludes land, site work, soft costs (design, engineering, permits), and landscaping. Total costs vary widely based on location, size, complexity, and finish level. Build in a contingency of 10–20% and research regional benchmarks before finalizing a budget.
How long does it take to design and build a custom home?
Plan for 2+ years from concept to move-in for a fully custom project. Design typically takes 3–6 months, permitting averages 1–2+ months depending on jurisdiction (longer in WUI zones), and NAHB data shows hired-contractor homes averaging 12 months from construction start to completion. Complex or high-risk zone projects often run longer.
Do I need an architect to design a custom home?
Licensed architects are legally required in most jurisdictions for structural drawings. California's Business and Professions Code allows exemptions for simple wood-frame single-family homes, but complex or WUI-zone projects generally require one. Verify requirements with your local building department.
What is the difference between a custom home and a semi-custom home?
Custom homes are designed from scratch to the owner's specifications — every decision is made by the owner and their team. Semi-custom homes start with a builder's existing floor plans and allow selected modifications and finish choices. Custom homes offer more control but require more time, decisions, and owner involvement.
What should I prioritize when designing a custom home on a limited budget?
Prioritize structural integrity, building envelope quality, and systems integration first — these are expensive and disruptive to change after construction. Decorative finishes (light fixtures, hardware, paint) can be upgraded over time after move-in without affecting performance or safety.
How do I design a custom home to be more resilient against fire, flood, or earthquakes?
Resilient design requires early decisions about structural systems, building envelope materials, and site-specific hazard response. Key elements include Class A roofing, ignition-resistant or noncombustible cladding, ember-resistant venting, and appropriate foundation systems for flood or seismic zones — all of which must be coordinated before permits, not retrofitted after.