But stacking blocks isn't as forgiving as it looks. Results vary dramatically based on foundation prep, reinforcement placement, mortar consistency, and grouting quality. Poor execution on any one of these leads to cracked, unstable, or moisture-damaged walls — regardless of the material's inherent strength.
This guide walks through every phase: what you need, the exact steps, the variables that matter most, and the mistakes that cause real failures.
Key Takeaways
- CMU walls resist fire, wind, and moisture — ideal for demanding or high-risk environments
- Success depends on a level footing, consistent mortar, proper steel reinforcement, and consolidated grout
- Most failures trace back to an unlevel base course, skipped reinforcement, or incorrect mortar. The material rarely fails; the process does
- Structural CMU walls (load-bearing, foundation, or home walls) require engineering input and permits in most jurisdictions
- Smaller landscape or garden walls are DIY-friendly; anything structural demands more precision and professional oversight
What You Need Before You Start Building
Getting the materials, tools, and permits in order before the first block goes down prevents the kind of mistakes that are expensive to fix mid-project.
Tools and Equipment
You'll need all of these before laying a single block:
- 4-foot level and string line
- Rubber mallet and masonry trowel
- Jointing tool (concave or V-profile)
- Mortar mixing paddle or drum mixer
- Tape measure and chalk line
- Brick saw or masonry saw for cutting blocks to size
- Safety glasses and sturdy work gloves
Materials and Block Selection
Standard CMU blocks are 8" x 8" x 16" nominal — the actual dimensions are 3/8" less on each face to account for mortar joints, per CMHA's unit specifications. Materials checklist:
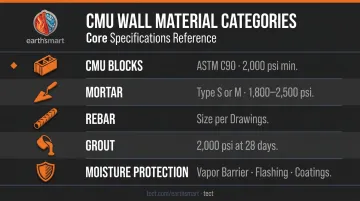
- CMU blocks: ASTM C90 loadbearing units for structural applications; minimum net-area compressive strength of 2,000 psi
- Mortar: Type S or Type M per ASTM C270 — Type M offers higher compressive strength (approximately 2,500 psi), Type S runs around 1,800 psi
- Rebar: Size and spacing per engineering drawings
- Grout: Must achieve at least 2,000 psi at 28 days per ASTM C476
- Moisture protection: Vapor barriers, flashing, and exterior coatings for any wall exposed to weather or below grade
On block type: hollow CMU (net cross-sectional area below 75% of gross) is better for reinforced structural walls where cells will be grouted. Solid CMU (75% or more solid) suits non-cored applications like paving or caps.
Planning, Permits, and Engineering
Structural CMU walls — load-bearing walls, foundation walls, home construction — require architectural or engineering drawings specifying block size, wall height, rebar size and spacing, lap splice lengths, and grout requirements. TMS 402/602 governs design and construction requirements and is referenced by the 2024 IBC.
Permit thresholds vary by jurisdiction. A few reference points:
- 2021 IRC: Exempts retaining walls under 4 feet (footing bottom to wall top) unless supporting a surcharge
- Los Angeles: Requires permits for masonry walls over 3 feet 6 inches
- Your local authority: Check before breaking ground — skipping permits creates liability, failed inspections, and real structural exposure
How to Build a Concrete Block Wall: Step-by-Step
Each step builds directly on the last. Errors in the base course cannot be corrected without demolishing completed work.
Step 1: Plan Layout and Establish Wall Dimensions
Before mixing mortar, confirm all wall dimensions align to block module dimensions — multiples of 8" or 16" — to minimize cuts. Snap chalk lines on the footing to mark the exact wall perimeter.
Then verify that all rebar dowels cast into the footing align with planned cell locations per your engineering drawings. Misaligned dowels force field modifications that compromise the structural design — and there's no clean fix once the base course is set.
Step 2: Prepare the Base Course
This is the most critical step. The entire wall's alignment depends on the first course being perfectly flat.
- Spread a mortar bed on the footing surface — use a screeded mortar bed to account for minor footing variation
- Set blocks into the mortar, tapping with a rubber mallet to seat them firmly
- Check level continuously — both side-to-side and end-to-end — across the full length of the course
A 1/4" deviation in the base course amplifies across every subsequent course.
Step 3: Lay Subsequent Courses with Running Bond
Running bond means each block is offset by half a block length from the course below, distributing load and eliminating continuous vertical joints that would weaken the wall.
- Apply mortar to the top face shells of each block (face shell bedding) and to vertical head joints between adjacent blocks
- Check plumb, level, and alignment every 2–3 courses using your 4-foot level and string line
- Embed horizontal joint reinforcement (ladder-type or truss-type steel mesh) in the mortar bed at every second course, or as specified by engineering drawings — this provides horizontal seismic and load resistance
Step 4: Install Vertical Rebar and Grout Cells
Thread vertical rebar through the designated cells, lapping it to the starter bars from the footing. Per CMHA's reinforcement guidance, minimum lap length is the greater of 12 inches or 40 bar diameters. If design tensile stresses exceed 80% of allowable steel tensile stress, that lap length increases by 50%.
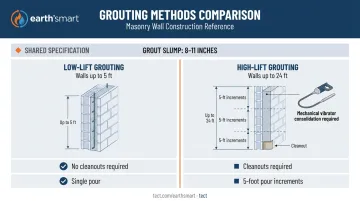
Grouting requirements vary by lift height:
- Grout slump: 8 to 11 inches at placement
- Low-lift grouting (walls up to 5 feet): cleanouts not required
- High-lift grouting (up to 24 feet): cleanouts required; pour in 5-foot increments
- Consolidation: use a mechanical vibrator with a 3/4" to 1" head; reconsolidate 3 to 10 minutes after initial placement
Cells without rebar can be left open or filled with rigid or loose insulation — a meaningful choice in fire-prone climates where thermal continuity affects both energy performance and assembly resilience.
Step 5: Finish the Wall
- Tool mortar joints before they fully harden — concave or V-joint profiles compress the surface for better weather resistance; raked or flush joints are not recommended on exterior-exposed walls
- Set a bond beam or cap block at the top of the wall with horizontal rebar grouted in place, tying the structure together and anchoring roof or floor framing
- Apply exterior finish: residential walls require a vapor barrier, rigid insulation, and a cladding layer (stucco, EIFS, or masonry veneer) — bare CMU on an exterior wall is not code-compliant for finished homes and is vulnerable to moisture infiltration
Critical Factors That Affect Performance
CMU walls can perform reliably for a century or fail within a decade. The difference almost always comes down to how well these four variables are controlled during construction.
Mortar Mix Consistency and Joint Thickness
Mortar that's too wet weakens bond strength. Too dry prevents adhesion. The standard is 3/8" joints — joints exceeding this thickness reduce the wall's compressive capacity.
Inconsistent mortar joints are the leading cause of cracking, water infiltration, and structural weakness in CMU walls. ASTM C780 field mortar testing evaluates consistency, not actual in-wall strength — a distinction that's often confused on the job site.
Achievable compressive strength (f'm) for CMU assemblies ranges from 1,350 psi to 3,000 psi depending on unit strength, mortar type, and grouting, per CMHA's compressive strength evaluation guidance. How consistently those variables are controlled during placement determines where in that range your wall lands.
Reinforcement Placement and Grouting Quality
Rebar placed off-center or improperly lapped doesn't fully transfer tensile forces. The wall looks complete but lacks the structural integrity the drawings specified.
Ungrouted or poorly grouted cells leave voids that compromise wall strength under seismic or wind loading. Key requirements to verify:
- Cell grouting: Confirm all specified cells are fully filled without voids
- Rebar centering: Check placement against drawings before grouting
- Lap lengths: Verify splices meet TMS 402/602 minimums
For high-seismic zones, consult a licensed engineer to confirm whether fully grouted walls are required for your specific design category.
Base Course Level and Footing Condition
The footing must be flat, fully cured, and true to dimension. CMU units should be aged at least 21 days before installation to reduce shrinkage cracking at the mortar-unit interface.
Do not start on a freshly poured footing. An unlevel base course cannot be corrected once subsequent courses are laid — it compounds with every row above it.
Moisture Protection
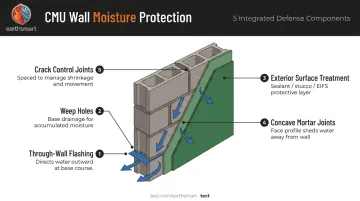
CMU is porous. Water enters single-wythe walls through driving rain, capillary action, groundwater, and vapor diffusion. Moisture protection is a system, not a coating:
- Through-wall flashing at the base course directs water toward weep holes
- Weep holes must be kept clear (mortar droppings during construction frequently clog them)
- Exterior surface treatments: integral water repellents, sealants, stucco, or EIFS
- Concave mortar joints improve water resistance compared to raked or flush profiles
- Crack control: uncontrolled shrinkage cracking provides direct moisture entry paths
Efflorescence — white salt deposits on the wall face — is a visible indicator of moisture movement through the assembly. It doesn't affect structural performance, but it signals that moisture management needs attention.
When Concrete Block Walls Make the Most Sense
CMU isn't always the right answer. Its advantages are most compelling in specific conditions.
CMU is a strong choice when:
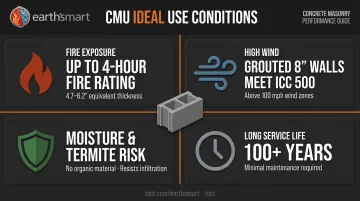
- Fire exposure is a real risk — qualifying CMU assemblies can achieve 4-hour fire ratings under ASTM E119 testing, with equivalent thickness requirements ranging from 4.7" to 6.2" depending on aggregate type. Fire rating depends on the full assembly, not just block type
- Wind design exceeds 100 mph — solidly grouted 8" walls with No. 5 reinforcement at 48" on center can meet ICC 500 shelter impact criteria under ASCE 7 high-wind provisions
- Moisture and termite risk is high — grouted CMU walls eliminate the organic material termites target and resist moisture infiltration far better than wood-frame assemblies
- Long service life is the goal — well-maintained CMU structures regularly last 100+ years with minimal structural maintenance
That last point matters most for homeowners rebuilding in Pacific Palisades and other Wildland-Urban Interface communities across Southern California. Earth'smart powered by tect works in this context specifically — their Earth'smart™ approach incorporates pre-insulated concrete masonry as part of a coordinated fire-resilient assembly, with structure, envelope, and systems aligned from the earliest design decisions.
CMU is less ideal when:
- Cold climates demand high R-value walls — achieving code-required insulation with CMU alone gets expensive and thick
- Complex architectural geometry makes block cutting impractical
- The project is a small landscape or garden wall where a segmental retaining wall system is faster and more forgiving
Common Mistakes When Building a Concrete Block Wall
Unlevel or underprepared base course. Starting on an uncured footing or skipping the leveling step is the most common serious mistake. Once you're three or four courses up, an unlevel base course cannot be corrected without demolishing the work. Check level constantly from the first course.
Skipping or misplacing reinforcement. Many builders omit horizontal joint reinforcement between courses or fail to lap vertical rebar correctly to footing dowels. Rebar placement must be planned before laying begins — you cannot thread rebar through a completed wall, and a wall that looks fine can still fail under lateral load.
Incorrect mortar handling. Mortar exposed to sun, wind, or excessive working time loses bond strength. Re-tempering (adding water to stiffened mortar) further weakens it. In hot, dry weather, working time drops sharply — know your limits before you start.
Ignoring moisture management. Skipping through-wall flashing, omitting weep holes, or treating moisture control as an afterthought causes long-term deterioration in otherwise structurally sound walls. Design the moisture protection system before construction begins, not after.
Conclusion
A concrete block wall built correctly is one of the most durable, low-maintenance wall systems available. The essentials — level base, proper reinforcement, consistent 3/8" mortar joints, consolidated grout, and integrated moisture protection — are straightforward. Most CMU failures trace directly to skipped steps, not material limitations.
Structural walls for homes require architectural and engineering oversight. For homeowners in fire, wind, or seismic-risk zones — including those rebuilding after wildfire in Pacific Palisades or other WUI communities — that means getting specifications and details right from the start. A coordinated team like earth'smart powered by tect, which integrates design, engineering, and product expertise from concept through construction, ensures CMU walls are built to the 100+ year performance standard the material is fully capable of delivering.
Frequently Asked Questions
Is it cheaper to build with concrete blocks?
CMU construction typically costs more upfront than wood framing. Long-term maintenance, insurance, and energy costs often offset that premium over 20–30 years — but per-square-foot comparisons vary widely by region and project scope. Factor in the full ownership period, not just the build cost.
What is the difference between concrete blocks and cinder blocks?
Cinder blocks historically used coal ash as aggregate; modern concrete blocks use sand, gravel, or other aggregates. Per CMHA, visual identification is nearly impossible — density alone doesn't confirm aggregate composition. All CMU used in construction must meet minimum code requirements regardless of aggregate type.
Do concrete block walls need to be waterproofed?
Yes. CMU is porous and requires a moisture protection system — particularly for below-grade, exterior-facing, or high-humidity applications. That system includes through-wall flashing, weep holes, and appropriate exterior coatings or cladding. Sealant alone is not sufficient.
Can I build a concrete block wall without mortar?
Dry-stack and adhesive-set systems exist for landscape applications. Structural walls — load-bearing, foundation, or walls above code height thresholds — require mortar and reinforcement. Skipping mortar in structural applications will not pass inspection.
How long does it take to build a concrete block wall?
An experienced mason typically lays 135 to 190 standard 8" x 8" x 16" blocks per day, per CMHA productivity benchmarks. A small garden wall might take a weekend. A full home foundation takes weeks, factoring in footing cure time, grouting, and required inspections.