Who should be doing this work? Experienced masonry contractors familiar with AAC-specific adhesives and leveling systems. Standard brick-laying teams can make the transition, but they'll need reorientation — particularly on thin-bed mortar application technique, joint thickness discipline, and seismic gap detailing.
This guide covers the complete installation sequence: site preparation through post-installation validation, with best practices for walls built to perform over the long term.
Key Takeaways
- The first course uses a sand-cement leveling bed; every course above uses AAC-specific thin-bed mortar at 2–3mm thickness
- Set corner blocks first at each level, verified in all three planes, before filling between
- Seismic gaps (typically 20mm) between AAC walls and structural frame elements require flexible sealant, not rigid mortar
- Never substitute standard sand-cement mortar for thin-bed mortar above the leveling course
- Complete all post-installation checks before plastering or any surface finishing begins
Installation Guide for AAC Blocks
AAC block installation follows a defined sequence: surface preparation → leveling bed → corner setting → course-by-course laying → lintels and structural connections → validation. Shortcuts in the leveling course compound through every subsequent course; misaligned corners at one level create cumulative plumb deviations that become visible only during finishing.
A skilled masonry team can typically complete AAC walls for a standard room in a day. The constraint is the leveling course — it must set adequately before subsequent courses proceed. This is the most common place where schedule pressure creates structural problems.
Prerequisites and Safety Considerations
Before a single block is placed, confirm the following:
- Substrate status: The slab must be structurally complete, clean, and checked for high points. The highest corner becomes the starting reference for the leveling bed.
- Block condition: Verify delivery for correct grade and density specification; inspect for transit damage (chips, fractures, corner loss). Do not install blocks that have been exposed to prolonged moisture without inspection.
- Material specification: Block density grade and fire-resistance rating must be confirmed at the design stage, not resolved on-site. For WUI construction in California, AERCON AAC products classified as noncombustible under ASTM E136 can support compliance with fire-resistive requirements, but project-specific approval depends on the assembly, jurisdiction, and AHJ.
PPE requirements:
- Dust masks and goggles during all cutting and grooving operations (fine silica dust)
- Gloves and skin-covering clothing when handling cement-based products
- Adequate ventilation in all cutting areas
Tools and Materials Required
Essential tools:
- Rubber mallet
- ¼-inch (6.4mm) notched trowel — per AERCON ESR-4740 specifications
- Masonry trowel (for leveling bed only)
- Builder's level and laser level
- String line
- Carbide or diamond-blade saw for cutting
- Clean 5-gallon bucket and drill mixer for mortar
Materials:
- AAC-specific thin-bed mortar (manufacturer-approved, per ASTM C1660-24) — for all courses above the leveling bed
- Sand-cement mortar (ASTM C270) — for the first leveling course only
- Rebar dowels — diameter and embedment depth per structural engineer
- L-bracket and Z-bracket steel connectors for frame connections — per engineer's details
- AAC-compatible flexible sealant or closed-cell polyurethane foam for seismic gaps
Standard Portland cement mortar must not be substituted for thin-bed mortar above the first course.
How to Install AAC Blocks (Step-by-Step)
Step 1 — Layout and leveling bed
Mark wall lines on the slab using control lines and chalk. Identify the highest corner of the slab; this becomes your reference elevation. Apply a full-width, ½-inch deep sand-cement mortar bed at this corner using a masonry trowel and work from the high point outward.
Where moisture wicking is a concern, add a water-resistant additive to the leveling mix.
Step 2 — Set corner blocks and build leads
Set the first corner block into the leveling mortar and tap to level with a rubber mallet. Repeat at every corner, adjusting mortar bed thickness to achieve consistent height. Check each corner in all three planes — level, plumb, and alignment — before proceeding.
Do not continue to fill courses until the leveling bed has adequately set.
Step 3 — Fill courses using thin-bed mortar
Pull a string line between set corners. Mix AAC thin-bed mortar to a consistency that flows cleanly through the notched trowel teeth. Apply to bed and head joints using the ¼-inch notched trowel, targeting a finished joint thickness of 2–3mm (per H+H, MPA Masonry, and Xella/Ytong specifications).
Lay blocks in a running bond with a minimum 8-inch overlap. Check plumb on each block as you go. Repeat the sequence for every course: corners first, then fill between. Do not tooth blocks or leave voids in joints.
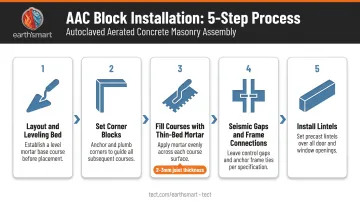
Step 4 — Seismic gaps and structural frame connections
Leave a gap (typically around 20mm, confirmed by your structural engineer) between AAC walls and all adjacent concrete columns, beams, and structural frame members. No universal code-mandated measurement applies to all systems — the project engineer must specify the exact dimension.
With the gap dimension confirmed:
- Drill and embed rebar dowels into beams and columns at engineer-specified intervals
- Set dowels into the AAC block courses
- Fill seismic gaps with closed-cell polyurethane foam or flexible joint sealant
- Never bridge these gaps with rigid mortar
Step 5 — Install lintels
Install AAC or concrete lintels over all door and window openings. Minimum bearing length is system-specific: Ytong/Aerated Concrete NZ specifies 200mm; Hebel specifies 150mm or L/8 (whichever is greater); H+H specifies 150mm. Follow the specification for your selected AAC system.
For U-block lintels, notch as required and pre-wet before pouring grout. Then observe these sequencing minimums:
- Wait at least 48 hours after concrete pour before installing blocks on door surrounds
- Allow 72 hours after walls are complete before MEP chasing begins
- All pipe routing must follow chisel-cutting guidelines to preserve panel integrity
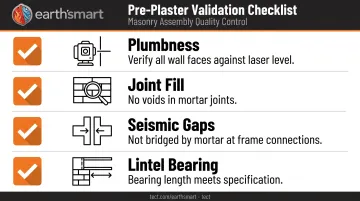
Post-Installation Checks and Validation
No plastering or surface finishing should begin until these checks are complete:
- Plumbness: Verify all wall faces with a laser level and aluminum ruler
- Joint fill: Confirm all joints are fully filled with no voids
- Seismic gaps: Check that gaps are maintained at all frame connections and not bridged by mortar
- Lintel bearing: Confirm bearing length meets specification on both sides of every opening
Indicators of correct installation:
- Wall faces are flat and continuous with no stepped joints visible
- All corners are square and plumb
- The leveling course shows no settlement or cracking before subsequent courses were applied
Defects missed at this stage get plastered over and surface as cracks after the building is occupied. A thorough check now is far less costly than repairs once the walls are finished.
Common Installation Problems and Fixes
These are the failure points that show up most often in AAC installation — and how to fix them:
Unlevel Leveling Course
Problem: Subsequent courses go progressively out of alignment, producing visible steps and plumb deviations.
Cause: The leveling bed wasn't checked simultaneously across all corners, or filling proceeded before adequate set.
Fix: Use a builder's level across all corners before any fill courses begin. Adjust mortar bed thickness during setting — not after.
Wrong Mortar Above the First Course
Problem: Wide joints (greater than 5mm), weak adhesion, visible joint lines under plaster, and potential water ingress over time.
Cause: Standard sand-cement mortar substituted for AAC thin-bed mortar above the leveling bed — typically to save time or cost.
Fix: All courses above the leveling bed require manufacturer-approved AAC thin-bed mortar applied with a notched trowel. The MPA Masonry joint blockwork datasheet confirms that conventional 10mm mortar joints reduce the thermal efficiency thin-bed systems are built to achieve.
Inspect product bags on-site before work begins.
Cracking at Wall-to-Frame Connections
Problem: Diagonal cracks at corners where AAC walls meet concrete columns or beams, typically appearing 2–3 months after installation.
Cause: Seismic gaps were not maintained, or gaps were left unfilled and later bridged by debris or rigid mortar. A 2020 peer-reviewed study on AAC masonry walls documented intersecting slant cracks emerging at approximately 60% of ultimate load under cyclic loading — confirming that connection detailing is critical to seismic performance.
Fix: Maintain gaps consistently at all frame connections. Fill with closed-cell polyurethane foam or flexible joint sealant. Install L- and Z-bracket connectors per structural engineer's specification.
Pro Tips for Installing AAC Blocks Effectively
Storage and handling:
- Store blocks on flat pallets, protected from weather; H+H guidance specifies no more than three packs high
- Inspect any blocks exposed to moisture before use — internal moisture weakens thin-bed mortar bond and can cause fracture under load
Hot and dry conditions:
- In temperatures above 30°C, lightly pre-wet block surfaces with a brush before applying thin-bed mortar to prevent premature adhesive set (per Xella/Ytong guidance)
- In dry but moderate conditions, H+H advises against wetting — adjust mortar consistency instead
Document the installation:
- Photograph the leveling course before it's covered
- Record mortar product batch numbers for every pour
- Log all cut or modified blocks at openings
For projects in WUI zones — Pacific Palisades, North Bay, Sierra Foothills, or active California rebuild areas — this documentation supports warranty claims, future renovation planning, and insurance requirements.
Earth'smart powered by tect coordinates this documentation as part of its integrated delivery model, capturing material specifications, structural connection details, and system performance data. For homeowners with an existing architect and contractor already in place, earth'smart powered by tect's Advisory service provides owner-side coordination without displacing that team.
Know when to bring in a specialist: That level of documentation complexity is also a signal about the project itself. AAC installation in multi-story structures, seismically active zones, or California WUI fire-risk areas with Chapter 7A requirements carries structural and code-compliance risks that are difficult to correct once construction is underway. Contractors should have direct AAC system experience — not just a general masonry background.
Conclusion
AAC block installation quality determines more than surface finish. It determines structural integrity, fire and seismic performance, and the service life of the wall system. A correctly installed AAC wall, in the right assembly and with the right connections, can contribute to a building envelope built to last well beyond 100 years. Poor installation undermines every one of those properties — no matter how good the block itself is.
Three decisions drive that outcome:
- Lock in block grade, mortar spec, and structural connection details at the design stage — not in the field
- Execute the leveling course and seismic gaps without shortcuts
- Complete post-installation validation before any finishing work begins
Frequently Asked Questions
How are AAC blocks installed?
AAC blocks are installed starting with a sand-cement leveling bed for the first course, with all subsequent courses using AAC-specific thin-bed mortar applied at 2–3mm thickness with a notched trowel. Corners are set and verified first at each level, then blocks are laid between in a running bond pattern.
Do AAC blocks need rebar?
AAC blocks don't act as structural reinforcement themselves, but rebar dowels are required at connections between AAC walls and concrete columns or beams. Dowel diameter, embedment depth, and spacing are determined by the structural engineer for the specific project and seismic zone.
What adhesive is used for AAC blocks?
AAC blocks require a manufacturer-approved thin-bed mortar (ASTM C1660-24), applied 2–3mm thick with a ¼-inch notched trowel. Do not substitute standard sand-cement mortar above the first leveling course — thick joints degrade both thermal performance and structural integrity.
Can AAC blocks be used in fire-prone or wildfire-risk areas?
Yes. AAC blocks classified as noncombustible under ASTM E136 — including AERCON products with 4-hour fire-resistance ratings at 6-inch thickness — are well-suited to WUI construction. Compliance with California Chapter 7A or IBHS requirements is assembly- and jurisdiction-specific, so verify block grade against local code before installation.
How long does the AAC leveling course need to set before continuing?
The sand-cement leveling bed typically needs several hours to overnight before subsequent courses should proceed, depending on ambient temperature and humidity. Continuing too early causes cumulative alignment failures in AAC walls.
Do AAC blocks require curing like traditional bricks?
AAC requires minimal water curing compared to traditional masonry. Manufacturer guidance varies — Xella/Ytong permits light brush pre-wetting in high heat (above 86°F/30°C), while H+H advises against wetting in dry conditions. Avoid over-wetting, as excess moisture compromises the thin-bed mortar bond.